So this week, my boyfriend and I decided to work on some studio portraits. We have our studio room all set up, but we just hadn’t gotten around to doing anything with the start of the semester. These are the first set of portraits taken of me! I love the way they turned out. 

Continue Reading

Weekend DIY

So this weekend I decided to try my first tester at dip dyeing fabric. I bought some Jacquard Procion MX dyes and soda ash, so I was all set.

I chose a pair of super old Forever21 jeans that I think I bought for like $12 back in 2010. I never wear them because they look awful. I cut the jeans conservatively short so that later I could cut and fray appropriately. I stuck them in a tub of bleach for two hours and then rinsed them.

After rinsing them, I soaked them in the soda ash solution for 20 minutes. Somehow, after they soaked in the soda ash, a brown mark appeared. I’m fraying that area but I will have to figure out why that happened. 🙁 Wah. So then, I mixed the dye and water. I dipped most of the jean into the mixture and let it sit for ten minutes before dragging it up slowly and stirring the dye. I repeated this until I had dyed most of the jean.

I used the Procion MX dye in Aquamarine
I let them dry out overnight and for most of the next day. Once they weren’t damp, I slid them on and remeasured where to cut. I shortened the shorts about one inch and frayed the rim (slightly; I’ll let the dryer do the rest). Then, I stuck a sheet of cardboard through the pants leg of one side, taped on the outline of a cross, and filled it in with black dye. I cut a slit where the brown mark was and frayed the area. I even decided to add some studs to the pocket opposite of the cross. After the black cross fully finished drying, I flipped the shorts to the back. On the back pockets, I added studs. I’ll have pictures up soon! But, I didn’t like the way the black dye came out after I washed it (should have used a higher concentration), so I’m redoing it with fabric.
These are my first ever DIY shorts. I didn’t think these would be wearable, but I am so glad they turned out okay! I wanted to test the dyes out before I went out and purchased more clothes to work on. I’m actually very excited. I think I will do a video on my next project. 

More soon <3
Passion

Continue Reading

Voluminous Curls

Hello hello! I have a new video up on how to achaive voluminous curls for any hair type. This doesn’t take a lot of prep and you can do it without having to worry about damaging your hair! This is probably one of my favorite ways to do my hair now because I love the feeling of having curlers in while I paint my nails or do my makeup.

I hope you enjoy!

xoxo
Passion

Continue Reading

Marina and the Diamonds

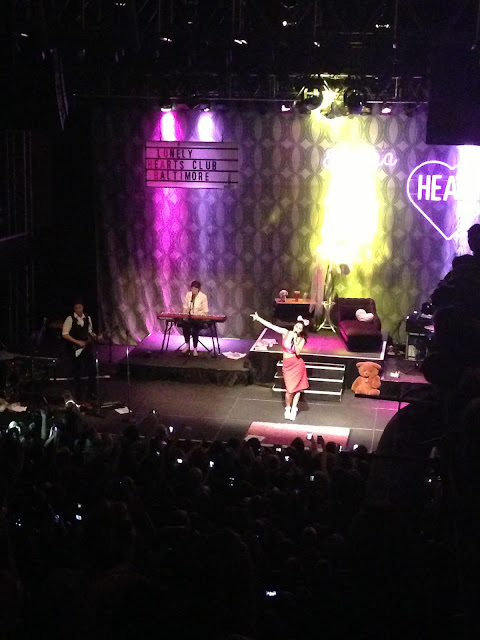
Last Sunday I got to see Marina and the Diamonds live! I’m a huge fan of her music and fashion sense, so I bought tickets as soon as my friend told me about the show.  I had so much fun ;3
Also, I made sure to rock my heart on my cheek:
I went with my boyfriend and met up with my friends Carolyn + Chelsea. When Marina came out on stage, the lighting, outfit, everything was amazing. Her voice is heavenly, especially live. 

(Isn’t the set adorable too?)
Here’s a quick video I took on my phone of “Sex Yeah”:

Even on my crappy phone camera, her voice shines through <3 SO amazing. I recommend listening to her if you haven’t yet.

Continue Reading

Easy Halloween Ideas

Hello everyone!

Halloween is one of my favorite holidays. I love dressing up and coming up with new ways to do old costumes. But, Halloween is also super expensive. Every year I budget myself no more than $50 to come up with a costume, hair, and makeup. I know some people even think that $50 is too steep for one or two nights.

You don’t have to break the bank to have the coolest costume at a party! I often buy or use clothes and accessories that I’d wear for every day to accentuate my costumes.

Here are some easy looks:

Zombie


Zombies are really popular right now because of shows like The Walking Dead. I decided on a bit of a twist. This is my half Zombie, half Beauty look. All I used was a cheap Halloween kit from Walgreens ($5), some baby powder, a glue stick, my own makeup, and a blue circle lens. 

Just cover half of your face in white paint, using a brush or sponge. I used a white face crayon to create an even line between both sides of my face.

Then, fill in directly under your eye (like eyeliner) with yellow + brown matte eyeshadow. 
Using the natural hallows under your eye as a guide, blend purple, red, yellow, and brown matte eyeshadow. Do the same thing around your nose and bottom lip. Think about how you’d look if you just got your ass kicked in a fight. 
Use a blush brush to add some purple matte eyeshadow to accentuate your cheek bones and lightly accentuate your jaw, temples, forehead, neck, and collar bone. Then, use a contour brush with matte brown eyeshadow to define exactly where your cheekbone is.
Next, use liquid latex or chunks from a nontoxic glue stick to create sores at the side of your mouth. When it’s pretty dry, color over with brown and yellow matte eyeshadow. It should look super cracked and gross.
I finished up with some pressed powder all over my face to make the white look closer to a paled version of my skin tone.

For the beauty side, I just did some natural brown eyeshadow with a winged black eyeliner and fake lashes. Sculpting your eyebrow is a MUST. And then just put on some red lipstick and blush.
Finally, brush out the hair (make it cray!), dust some baby powder all over to give it a dusty dirty look and plop a blue circle lens (or a cool Halloween one) in the eye on the zombie side and you are all set!

Gothic Doll

A Gothic Doll looks is fun because you probably already have the outfit for it. All you need is something cute, and it can always be day to day wear. And, all you really need to buy are false lashes and possibly white Halloween face makeup.
To get this look, start by applying a foundation two shades lighter than your natural skin tone. Blend down the neck as far as you want. I used some of the white halloween makeup, mixed with my regular foundation. 
Trace on your eyebrows. You can have fun with them and add a bigger arch if you want to look really cartoonish.
Apply a light pink eyeshadow over your lids. Then, add a slighter more vibrant pink at the corners. Using a contour brush, apply a darker shade of magenta to your crease and blend it so it looks like a smoky eye.
Use a white eyeliner for your water line and below your eyelashes. Take a black eyeliner pencil and outline around this to form your new lower eyelid. Apply false lashes around this new lid. Then, apply false lashes to your regular upper eyelid.
Using a super bright pink blush, apply generously to the apples of your cheeks in a circle.
Lastly, conceal your lips and then using a lip liner, trace out your perfect doll pout. If you need help on this step, there are plenty of videos on youtube. Just look up “doll lips”.

OPTIONAL: Buy fake bangs! They are add so much to the look, especially if you do pig tails.

Good luck! If you have any questions, just comment below.
Passion
Continue Reading

Geo Lens Review

I bought some super cute circle lenses and I decided to do a review!


These are the Geo Nudy series in Golden Blue.

I love them so much! I don’t wear contacts because I have really good vision, except for at night from far away. But, it’s not so horrible that I need to wear anything to enhance my vision. Circle lenses for me are entirely cosmetic.

Even in low light, these are noticeable. For super blue eyes, they look best in day light.

I would say comfort is a 10/10. You just need to make sure they are not inside out. I make sure to clean them thoroughly before putting them in. Even though lenses sit in contact solution, make sure to clean them again! Just a quick rinse with lens solution and bam, comfort is increased. 
The color is so intense! I have naturally very dark brown eyes and regular brands don’t work as well as circle lenses do. However, it’s only safe to wear these for 5-6 hours, so I would recommend wearing them for school or work and then give your eyes a break. 
A lot of people ask me where to buy circle lenses. Looking online can be dangerous, as there are many knock offs in the market. What’s wrong with knock offs? They can scratch your eye! And cause all kinds of bacteria and sometimes blindness. I purchase all of mine from honeycolor.com because they are all authentic and good quality. Plus, it’s not too expensive and the shipping is decently fast!
Also, when your lenses arrive be sure to soak them in a regular contact solution for 8-10 hours. The solution they come in isn’t good for you!
Hopefully this helps! Let me know when you guys get some.
~Passion

Continue Reading